by: Shivansh Goel
Introduction
How does EC2 AWS Work?
EC2 (Elastic Compute Cloud) is a web service provided by AWS that allows customers to rent virtual machines (VMs) in the cloud to run their applications. EC2 instances can be launched from a variety of pre-configured Amazon Machine Images (AMIs) or custom images uploaded by the user.
When a user launches an EC2 instance, they can choose the type of instance they want based on the amount of CPU, memory, and storage required. They can also choose the region where the instance will be located and the type of operating system and software that will be installed on it.
Once an EC2 instance is launched, the user has full control over it, just as they would with a physical server. They can install their own software and applications, configure the network settings, and manage the storage.
Why is EC2 AWS useful for projects?
EC2 AWS is useful because once an EC2 instance is launched, then the user can do whattever they need to do with it just like if it were their own computer.
This allows a lot of scalibilty, Flexibility(EC2 provides users with a wide range of instance types, operating systems, and software options to choose from.
This allows users to select the resources that are best suited to their specific project requirements, and to easily switch between different configurations as needed), and Reability(EC2 is designed to be highly reliable, with built-in redundancy and failover mechanisms to ensure that applications remain available even in the event of hardware or software failures).
AWS Devolpment
Setting up the Server and Cloning the Project
Deployment Process:
- First connect to an Ubuntu EC2 instance on AWS and then begin the system and software setup.
Update and Upgrade the System
- sudo apt update sudo apt upgrade
- sudo apt install docker
- sudo apt install docker-compose -y
- sudo apt install html2text
- sudo apt install python3-pip nginx
- sudo pip3 install virtualenv
Clone and Change Directory to project location
Clone your gitserver into a directory of your choosing
- git clone https://github.com/yourgitserver
Making sure that the Web Service can Run
To make sure that the Web Service to running properly
- Run the main.py file and see if the server is able to run If there are some errors, try running the command:
- pip install -r requirements.txt
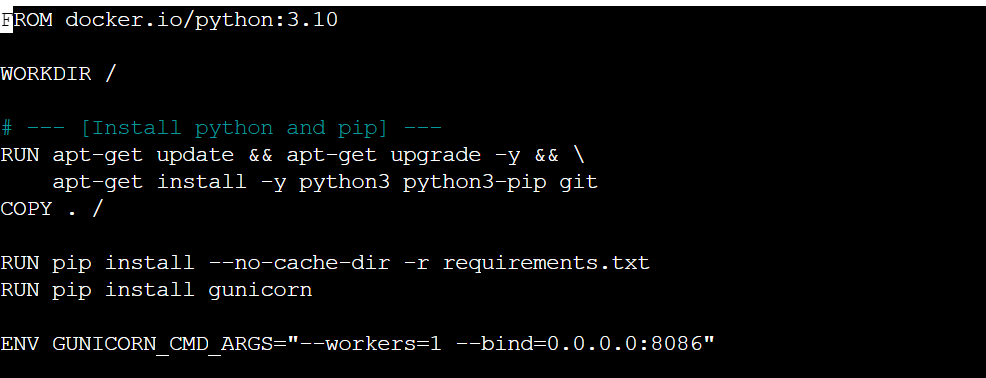
Make sure that there is a Dockerfile or that it is up to Date
- Edit the Dockerfile: sudo nano Dockerfile Make sure that it looks like something like this:
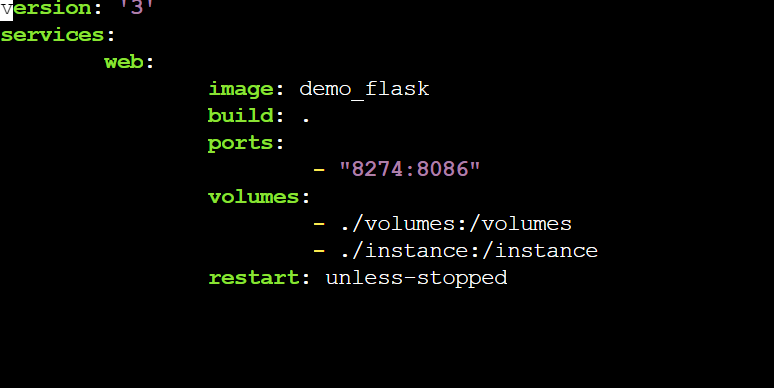
Make sure that the docker-compose.yml is up to dagte
- Edit the docker-compose.yml file and edit the left port to your own unique one, volumes, and the image
Start Running Docker
- sudo apt install docker
- sudo apt install docker-compose -y
- sudo docker-compose up -d
- It should complete 9 steps of procesess to confirm that it is complete
Make sure to Verify that the Web Application is working with Docker
- docker-compose ps
Make sure you find the application that matches the application name and ports. If you can’t find them that means that you did something wrong and that you should go back to finish other steps.
Testing Localpoint
To make sure that all the previous steps are running correctly and the everything is going on the right path. You should run these commands to see if there is a success or a failure.
- curl http://localhost:[yourport] If there is a “Failed to connect”, then that means that something is not going right and that you should look at the changes you have made in the server.
-
Another command to run would be: curl http://localhost:[yourport] html2text
Test preparation for Docker Web Application using IP for Internet Access
First make sure to install Nginx
- Run the command to make sure that Nginx is installed within the system: sudo apt install nginx Move to /etc/nginx/sites-available whichis where the Nginx Server Configuration Files are located
- Create your own configuration in the directory with a name of your choosing (sudo nano example)
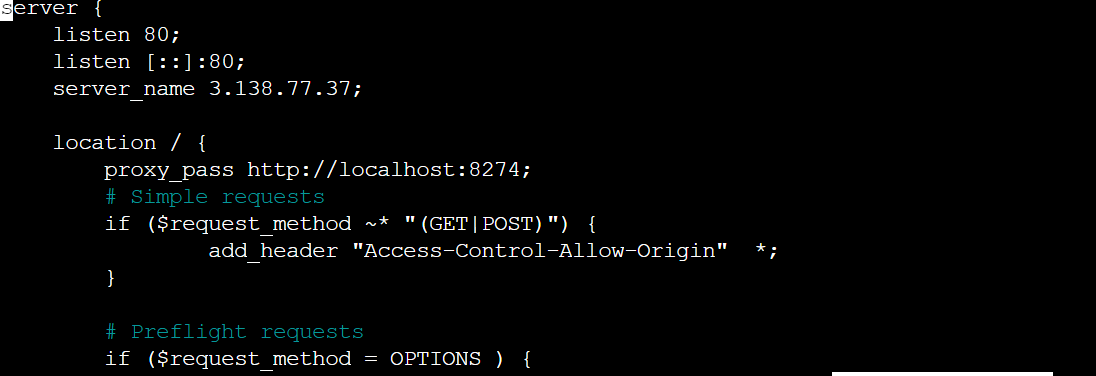
- Add these stuff to the Nginx Configuration File:
Make sure to edit the server_name (IP Adress), the proxy pass POrt, and the docker-compose
Activate the NGINX Configuration
- sudo ln -s /etc/nginx/sites-available/[your config file] /etc/nginx/sites-enabled[your config file]
- sudo nginx -t If there are errors then you must go back and repeat the steps of the NGINX configuration in the sites-available directory and see if there is anything wrong or misplaced.
Last Steps before the Last Steps
- To Conclude the first part, make sure that the internet is now running your web application: Go on the internet and run this: http://(your ip address)
The Last Steps
The last Steps involve setting up the DNS Server
Video
Hacks Time
FRQ Question Hacks (Answer with more than 2-3 full complete sentneces):
-
Are there any outdated Nginx/Docker functionalities to address?
-
Is there anything unclear that we need to communicate further to the students for deployment?
Diagram
To Truly understand Nginx and why we are using it, it is important to compare it to other web servers? Compare NGINX with lighttpd in a Venn Diagram, and place the image below:


